How to Make Afro House in Ableton Live 12: Percussion, Bass, Chords and Full Arrangement
To make Afro House in Ableton Live 12, start with a grounded four-on-the-floor pulse, build a conversational percussion layer, and leave enough space for a rhythmic bass and memorable harmony. Around 122 BPM is a useful practice tempo, not a rule. Human timing, careful dynamics and a clear arrangement matter more than filling every available step.
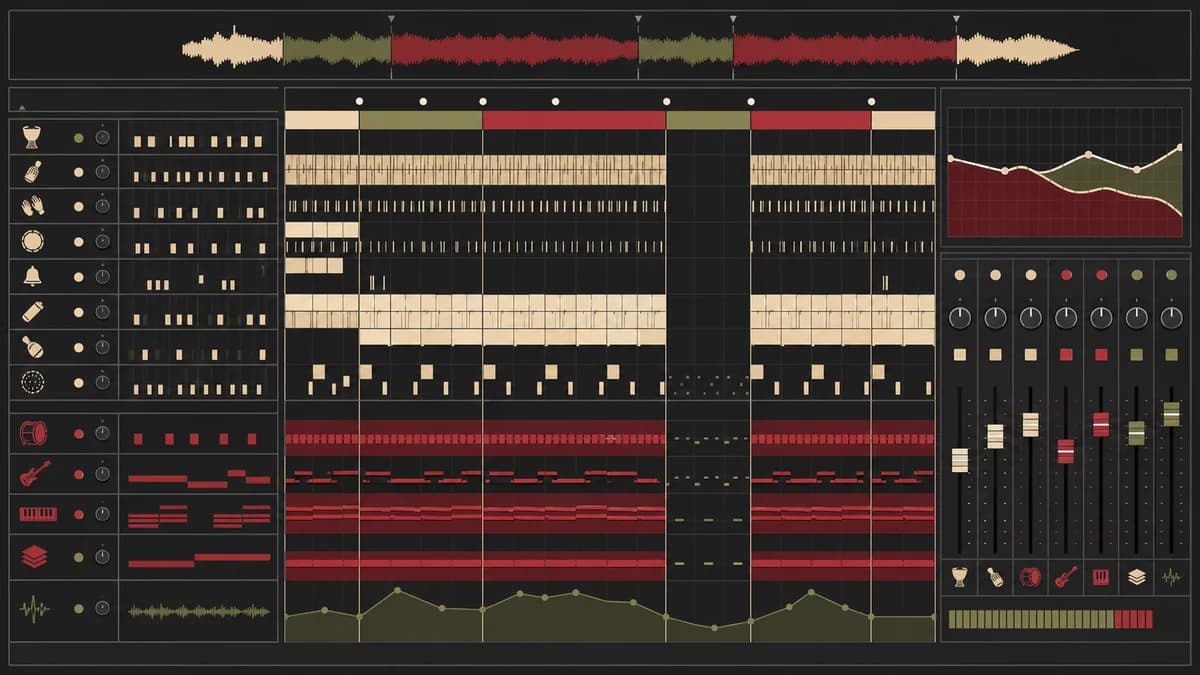
Define the musical foundation and map the full arrangement

Afro House is not defined by one drum kit, one region or a checklist of supposedly exotic sounds. In production terms, the name usually describes house music in which layered percussion, cyclical rhythm, low-end movement and patient development carry unusual structural weight. The respectful approach is to work from rhythm and musical intention, study the traditions behind any source material, and avoid using cultural signifiers as decoration. A convincing track can be sparse or dense, electronic or acoustic, vocal or instrumental; what connects these choices is interaction rather than stereotype.
Open a blank Ableton Live 12 Set and choose a practice tempo around 122 BPM. This sits in a useful middle ground for hearing the relationship between a four-on-the-floor kick and syncopated percussion, but it is not a genre law. Audition references at their original tempo, decide how much breathing room your own material needs, and change the tempo before detailed automation. Warped audio can behave differently after large tempo moves, so make the broad decision early and confirm that important loops still groove without obvious stretching artifacts.
Before sound design, place locators for intro, development, break, main section and outro. A working DJ-oriented sketch might reserve 16 or 32 bars for the intro, introduce the central rhythmic identity over the next 32, reduce energy in a break, return with a stronger combination, and remove elements progressively in the outro. Treat those lengths as a diagnostic grid. If an idea needs 24 bars to unfold, use 24. The point is to see a whole journey while the project is still inexpensive to change.
Build an energy map underneath the locators. Mark where kick, bass, main percussion, harmonic hook and foreground motif enter or leave. Then identify one new event every four or eight bars: a mute, fill, reversed tail, filter move or brief silence. This prevents the common arrangement in which all channels continue for several minutes and only a large breakdown indicates progress. Small changes preserve continuity for dancers and give DJs predictable phrases without turning the track into a rigid template.
Work at three listening scales. At one bar, check that the groove loops naturally. At eight or sixteen bars, check whether repetition creates anticipation. Across the full arrangement, check contrast and recovery. A strong one-bar pattern can still make a weak record if every phrase is identical. Conversely, an understated sound can become the track's signature when it is introduced, removed and returned at the right moments. Save a simple reference bounce now so later processing can be compared with the original musical idea.
| Section | Typical job | Useful change |
|---|---|---|
| Intro | Establish pulse for mixing | Add percussion in layers |
| Development | Reveal rhythmic and harmonic identity | Open filters or introduce bass |
| Break | Create contrast without losing direction | Remove kick and shorten the motif |
| Main section | Deliver the strongest combination | Return bass with a new response |
| Outro | Release energy for the next mix | Remove melodic and low-end layers |
Program kick, shakers, congas, toms and syncopated percussion

Start with a kick that stays clear at the chosen tempo. Program four steady hits per bar, set its level conservatively, and listen before adding a second layer. A long boomy tail can occupy the same time and frequency space that the bass will need; a very short kick may require more support. Tune by ear in the context of the loop rather than forcing the fundamental to a note displayed by an analyzer. The useful choice is the one that provides a repeatable centre for the rest of the rhythm.
Add a closed shaker or hat as a reference subdivision. Instead of raising its velocity uniformly, sketch a dynamic contour: stronger offbeats, quieter connecting hits and an occasional omission. Duplicate nothing yet. The first shaker should explain the pulse clearly enough that a listener can feel motion with the kick muted. Then add a complementary high layer only where it contributes a different articulation or stereo colour. Two nearly identical busy loops often create phasey brightness and consume headroom without improving the groove.
Place congas and toms as answers, not as a continuous wall. Pick one low or mid drum for a recognisable call and a second sound for a shorter reply. Write the rhythm with a limited pitch set, then vary an ending every fourth or eighth bar. If using recordings connected to a specific performance tradition, understand and credit the source and confirm the license. Production software can move notes, but it cannot replace cultural context or turn restricted material into authorised material.
Claps, rims and short percussion can clarify the backbeat while leaving the kick dominant. Try a clap on beats two and four, then reduce it to selected phrases if it feels too conventional. A rim slightly before or after another accent can create conversation, but random offsets on every track usually make the pocket vague. Choose a small hierarchy: kick is the anchor, one percussion line carries identity, and supporting layers provide subdivisions, answers or transitions.
Route related percussion to a bus and level-match whenever processing it. Gentle saturation can connect different sources, while a small amount of compression may contain occasional peaks. Heavy bus compression can erase the velocity pattern that made the sequence feel performed. Check the bus in mono, bypass processing at equal loudness, and listen at low volume. If the rhythmic roles remain readable without bright top end or stereo width, the pattern is structurally sound rather than dependent on polish.
- Give each percussion lane a distinct rhythmic role.
- Use omissions and phrase endings before adding more sounds.
- Confirm the license and context of any third-party recording.
- Level-match the percussion bus before judging processing.
Create human motion, a rhythmic bass and supportive harmony

Human feel is the result of relationships, not universal randomness. First vary velocity according to the role of each hit. Main accents should remain reliable; connecting notes can breathe. Next test groove on one or two supporting clips through Ableton's Groove Pool. Lower Timing and Velocity values reveal whether the extracted or supplied groove improves the pocket. The Live manual explains that Timing, Random and Velocity are separate controls. Use Random as a restrained audition tool, because uncontrolled changes can weaken intentional syncopation on every playback.
Microtiming is most useful when it establishes a stable push or pull. Move a shaker slightly late and compare it with the kick; place a short rim slightly early if it creates forward motion. Do not move the kick automatically. Freeze the experiment by duplicating the clip, name the versions, and switch between them without watching the screen. If the adjusted pattern only seems better because it is louder or wider, the timing decision has not yet been proven.
Design the bass after the kick and main percussion are understandable. Begin with a simple instrument, a low-pass shape and a short phrase. Leave clear gaps around the kick attacks, then add syncopation where percussion creates a question the bass can answer. A deep bass does not need a permanently held sub note. Note length, envelope release and rests determine weight as much as oscillator choice. Check a small speaker or a band-limited reference to confirm that rhythm remains audible above the lowest octave.
The detailed low-end method belongs in the existing guide to kick and bass, so keep this stage focused: decide which element owns the deepest sustained energy, make envelopes complementary, and use sidechain only when it solves an audible overlap. Automatic extreme pumping can erase a good bass phrase. Compare sidechain, volume automation and note editing. The cleanest option is often a shorter bass note rather than a more complicated processor chain.
Add chords, piano, pads or a restrained melodic phrase only after rhythm and bass hold attention. Use a small harmonic vocabulary and voice chords so their lowest notes do not compete with the bass. A piano can provide attack, a pad can sustain atmosphere, and a short motif can mark sections; they do not all need to play continuously. Automate tone, reverb send or note density to create progression. Preserve silence around the hook so listeners recognise its return.
Arrange transitions, control the low end and learn from templates

Turn the loop into a record by subtracting before adding. In the intro, expose enough percussion for a DJ to read the phrase. Introduce the bass when it changes the groove, not merely because a locator says so. Before the break, remove one familiar layer so the transition begins psychologically before the impact effect. In the break, preserve a pulse, motif or texture that connects to the track's identity. At the return, combine familiar elements with one meaningful variation instead of adding every channel at once.
Automations should explain energy. Filter a percussion bus gradually, shorten a reverb tail before the kick returns, or mute the final beat to create space. Print or freeze effect-heavy transitions once they work so the arrangement remains reproducible. Fills are strongest when they replace part of the groove rather than sit on top of it. Test transitions eight bars early and eight bars late; the listener experiences context, not an isolated sweep.
For a basic mix, keep the master free of accidental clipping, compare at moderate volume and organise the low end first. High-pass only when unwanted energy exists; aggressive filtering on every sound can thin the record and create phase changes. Check kick and bass together in mono, monitor the percussion bus separately, and reduce competing low mids in chords rather than boosting the sub. Use a trusted house reference for balance and structure, not as a target for copying exact loudness or timbre.
A complete Ableton template is educational when it exposes decisions: clip lengths, routing, group balance, automation and the timing of entrances. It should be analysed, not treated as a finished identity. Disable channels, trace the signal path, rebuild one section in a blank Set and replace sounds methodically. The earlier guide on production templates explains this learning method in depth. A useful template shortens setup time while leaving musical choices open.
Frequent mistakes are easy to diagnose: every percussion lane uses maximum velocity; cultural references are reduced to presets; the sub and kick sustain together; the arrangement changes only at the breakdown; transitions hide a weak loop; or the master is processed before balances work. Correct one cause at a time. Finish with an A/B export, verify the first and last 32 bars for DJ use, and listen away from the project screen. The goal is a coherent conversation between rhythm, bass and harmony, not compliance with a fixed formula.
- Use a 122 BPM sketch as a starting point, never a universal rule.
- Keep one rhythmic anchor and assign supporting roles.
- Build transitions by subtraction and context.
- Check kick and bass in mono at matched loudness.
- Study templates by rebuilding decisions in a blank Set.
PUT THE WORKFLOW TO USE
Put the Afro House workflow into practice
Explore real House Pirata project categories and inspect the available session details before choosing a template.QUICK ANSWERS
Frequently asked questions
What BPM should Afro House use?
There is no mandatory tempo. Around 122 BPM is practical for this exercise, while the right tempo depends on the groove, references, arrangement and intended set context.
How do I make percussion feel less mechanical?
Start with intentional velocity accents, selective groove and stable microtiming relationships. Use omissions and phrase variations before adding random movement to every lane.
Does Afro House need congas or a specific instrument?
No single instrument defines the style. Rhythmic interaction, low-end movement, arrangement and musical context matter more than a preset checklist.
Should I sidechain every bass note to the kick?
Only if audible overlap needs that solution. Note length, envelopes and arrangement can create cleaner space with less pumping.
Can an Ableton template teach arrangement?
Yes, when you trace routing, automation and section changes, then rebuild the decisions yourself. Copying the Set unchanged teaches much less.
KEEP BUILDING
Related production guides
Kick and Bass in House: Phase, Space and Groove
Understand the relationship between house kick and bass by defining frequency roles, checking phase, shaping note lengths and using sidechain movement that protects both punch and groove.
Why Ableton House Templates Improve Production
Learn how a focused Ableton house template preserves groove decisions, removes repetitive routing and helps producers turn promising loops into polished arrangements without losing originality.
Deep House Drum Grooves: Swing, Ghost Notes and Space
Program deep house drum grooves with subtle swing, quiet ghost notes and enough negative space for bass, chords and vocals to breathe.